Wednesday, April 29, 2009
assemblying a computer
A couple of weekends ago my older brother wanted a high performance computer and he decided to buy the parts desperately and assemble it himself so he can customize it. I had nothing better to do so i decided to give him a hand. The first step was to install the cpu and the fan to the motherboard. The fan, which is the large circular shaped metal part in the picture, works by using a metal heat sink to draw the heat away from the cpu. It has a large surface area and a fan to keep the cpu cool and prevent overheating. The motherboard itself has over 80 capacitors, most of them were small but there were a few larger ones. We then installed the motherboard into the computer case. Next step was the graphics card. All of the circuit boards came in a metallic coated bag,shown in the picture, which prevents any static electric charge from destroying any of the electronic components. this happens because of Faraday cage which disperses any current around the outside while keeping the inside completely unaffected by any charge. After we installed the memory ram and the hard drives. The hard drives have an electromagnet so we had to make sure it did not come close to a strong magnet which would have messed up the hard drive. All the was left was to connect all the wiring and the power supply and all the small components. The end product is a high performance custom computer.
Sunday, April 5, 2009
Car speakers
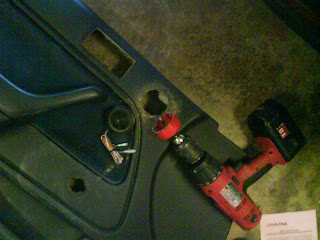
A couple of weekends ago i installed a new audio deck for the car i just got. Now the next step was to get speakers to replace the 16 year old blown out stock speakers. The first step was to remove the door panel to get to the speakers. The old speakers, as you can see in the picture, were blown out and the cone was no longer attached to the outer edge of the speaker like it should be. Replacing the speaker was as easy as unscrewing the old one and screwing in the new one. The two speaker wires were striped and connected to the corresponding positive and negative feeds on the new speakers. The new speakers i bought also came with tweeters. To install these i had to drill a whole into my door panel then wired the positive and negative wires for the tweeter. Both speakers have the same components; a permanent magnet, an electromagnet that is pulled and pushed by the permanent magnet when a current pass through the wires, and a cone to increase the surface area that pushes the particles of air. The tweeter is smaller and is used for the higher frequency sounds. higher frequencies have more vibrations per second so the smaller area of the tweeter is able to vibrate faster to produce the higher treble pitches well. The other speaker has a medium size cone and is used for mid range frequencies. The larger area of the cone allows for more air to be pushed and at lower frequency than the tweeter to produce the mid to low bass range sounds. After i put everything back together the new speakers sounded great. Now all i need is a sub-woofer to get some real bass.
Monday, March 9, 2009
Car Stereo Wiring
Last weekend i decided to work on my car stereo system. I just got my used car which is a 93 accord with a stock stereo system. The deck only had cassette tape and sounded terrible so i had to do something about it. I bought an Alpine deck from my friend to install. In order for the deck to be compatible i had to buy a wiring harness. The stock deck has a clip that connects to the stock deck. The harness has wires that have to be connected to the new deck and then clips into the stock clip to properly connect all the wires. In order to connect the new deck's wires to the wire harness i used crimps, which are conductive connectors with and insulation around it used to connect two wires. The wires are color coded with a key on the new deck and must match up with the old stereo wiring. Two wire are dedicated for each of the four speakers; one for the positive wire and negative wire. One wire is connected to the power source to have a 12 V difference. Another wire connects directly from the new stereo to the frame of the car and acts as a ground. This completes the flow of electrons making a current. The two power wires are much thicker than the speaker wires because a larger wire allows for more current and more power. Another wire connects to the antenna for the radio and a final wire is connected to the ignition to tell the stereo when to start up. After the wire harness was wired correctly to the new stereo all i had to do was clip it to the old stereo wiring and install it into the car dash. The new deck worked perfectly and sounded good (and i save some money on installation fees).
Monday, February 16, 2009
battery charger
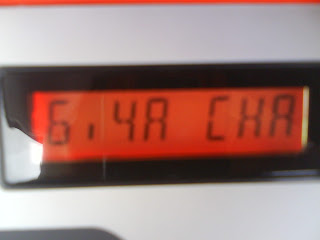
This weekend I tried to start my car because we had to take it to the body shop to get fixed. The car had been sitting in the garage for over two months so I wasn't sure if the car would run. When I stuck the key in the ignition the car wouldn't start. Not even the car lights would work; the battery was completely dead. Because the battery had been sitting for months without the car being started which recharges the car battery, the battery now had not enough voltage difference to start the car. I needed to recharge to battery so i connected it to a car battery charger. This device uses current from an outlet and uses it to recharge energy to the dead battery. The charger used a 6.4 Amp setting. This means that 6.4 coulombs were being transferred back to the battery per second. After a couple of hours or charging I hooked the battery back up to the car. Now, when i turned the key the battery had a big enough voltage difference and coulombs of energy to start the car.
Sunday, February 1, 2009
physics of electric tape
This weekend i was helping my brother install some car stereo things and one of the tools we used is electric tape. When i taped the wires together i now realized why electric tape is used when dealing with electricity. The wire which caries the electric current is a conductor. This means that electrons easily flow throughout the wire and the wire. The plastic that covers the wire is an insulator. This has a very important purpose because it isolates the wire protects any other conductors, including myself, from coming in contact with the wire and also receiving and electric current. Electric tape is made up of a plastic that is very similar to the insulator that covers the wire. The plastic tape holds and added electrons obtained in the same region and prevents them from being transferred to anything else. When connecting two wire together, electric tape is used to cover and exposed wire to make sure that the wire, which is a conductor, does not come in contact with another conductor. This keeps the circuit closed and prevents any chance of a short circuit.
Sunday, January 25, 2009
television static electricity
I always wondered why my arm hairs stood up when I rubbed my arm against a TV. Now because of physics I know that it is because of static electricity. I wanted to experiment a little with the static electricity of the TV and a piece of foil. If i bring the two object near each other initially there is not attraction. This is because both objects are neutral. However, if i turn on the television, somehow electrons are lost or added making thee TV charged. The charge of the TV is what makes your arm hairs stand up. Now if i bring the piece of foil near the TV it is attracted to it and the foil temporarily sticks to the TV. When the two object touch the TV gives off some of it electrons to the foil by charge by contact making the initially neutral foil negatively charged. Because foil is a conductor the electrons immediately spread throughout the foil. Now both objects are negatively charged so they are no longer attracted and the foil falls off. If i were to ground the TV by rubbing my arm against it before moving the foil near there will be no attraction between the foil and TV. That is because by rubbing my arm against the TV my body takes in all excess electrons and transfers them to the ground making the TV neutral once again.
Sunday, December 14, 2008
torque and punching bags
This weekend, i was with my brother when he was working out hitting the punching bag. When he was hitting the bag i noticed that the bag swung more or less depending on the place he hit the bag. This reminded me of the torque equation that we learned on friday which is torque equals force times lever arm. The force that my brother was hitting the bag at is about the same no mater where he hits the bag. But the lower he hit the bad the further it traveled. this is because the axis of rotation is above the bad where the chain is mounted to the ceiling. The lower he hits the bad the longer the lever arm is. A longer lever arm with the same force increase the amount of torque. The net force of the torque translates into angular acceleration of the bag making it rotate up. The lower he hit the bag the more torque and the greater amount of angular acceleration. Another thing i noticed is that he always hit the bag perpendicular to the lever arm. This maximizes torque because only a compenet of the force applied transfers into torque. If he were dumb and hit the bag at the hinge, the will be no torque and angular acceleration because the lever arm is zero. If he were to hit the bag directly underneath and straight up toward the hinge he there will also be no torque and angular acceleration because there is no component of force perpendicular to the lever arm.
Subscribe to:
Posts (Atom)